
Hello everyone! Today, I am sharing a few tips and tricks that can hopefully help you ace your DPT inpatient practical exam and be a total rockstar! Practical exams can be really, really tough. You may know may know all of the necessary information to be successful. You may be confident in your abilities to perform a thorough examination/evaluation and devise an effective intervention. However, having proctors view and grade every single move you make can be very nerve-wracking. And in the worst case scenario, you may freeze up and forget everything you've worked so hard to master. So, if you're interested in learning about what strategies I have used to do well on inpatient practical exams and important things you should know, just keep reading!
The Big 5: What Your Proctors Want to See from You
Professionalism.
Professionalism is key - always. Show up a few minutes early looking as sharp as possible. For my inpatient practical, we were required to wear professional, business clothing. Since many inpatient PTs wear scrubs, your program may allow you to wear scrubs for your practical. But, my guess is that most programs would require you to wear professional, business clothing just like mine. Come prepared with a clipboard, writing utensil, blank scrap paper, a watch, bf`and any clinical equipment you may need (i.e. gait belt, stethoscope, blood pressure cuff, etc.).Listening/communication skills.
As a PT, listening skills are so, SO important! Be an active listener and show genuine interest in your patient's needs and concerns. Don't be that person that's not actually listening to every word someone is saying because you're simply waiting for your turn to speak. Let them finish talking before you proceed to talk and try not to interrupt them. If they get off topic, kindly guide them back in the right direction. Eye contact and body language are also important aspects of listening. Be prepared to write down important things that they are saying, but writing down every single word is just not necessary and can sometimes be perceived as you not actually listening - just doing a whole bunch of writing. Jot down the main details and actively engage with your patient through positive body language gestures, such as nodding your head and repeating their responses. Also, be in control of your facial expressions because you never know how they may be perceived by your patient (or your proctor).
Communication skills piggyback off of some of the key concepts of listening skills. When you are communicating with your patient, make sure you are not using slang or lavish medical terms that they may not understand. Appropriate vocabulary is essential not only for you and your patient to be on the same page, but for them to trust you and feel comfortable with you. Be aware of your tone and never talk down to them just because they may be in an injured, disabled, dysfunctional, or ill state. Also, be cognizant of how you refer to their current state while you are addressing them. For example, proper language to use would be “the involved side, uninvolved side, surgical side, or non-surgical side.” Try to avoid using terms like “the bad leg, the good leg, the weak leg, or the strong leg.” If you have to ask a question that could be awkward or make the patient feel uncomfortable, such as one about alcohol or drug use, make it personable and aim to have a casual conversation. Remember, you should begin building a comfortable and trusting relationship with the patient as soon as you walk into the room!Patient sensitivity.
Once you get into the "real" world with "real" patients, this is so, SO crucial! So, what better place to start enforcing this value than in a practical?! You should always act in a respectful manner and never discriminate towards a patient based on age, gender, race, nationality, religion, ethnicity, social or economic status, sexual orientation, education, health condition, or disability. Never show bias and always treat your patient as a whole. Also, make sure you are using person-first language to speak appropriately and respectfully to or about a patient (i.e. "person who uses a wheelchair" instead of "wheelchair-bound person" or “person with an amputation” instead of “amputee”). Identify and respect others' differences, maintain a positive attitude, and always act in the best interest of the patient.Confidence.
You HAVE to be confident during your practical! Walk in that room and be ready to do the dang thing! Be confident in everything you do, from the evaluation, to transferring, to gait training. If you have to take a moment to gather your thoughts - then absolutely, take a moment and do just that. If you felt like you messed something up, correct it the best you can, recover, and move on to the next thing! Just because your proctor is writing something down does not mean that it is bad - it could very well mean that they are making note of something you did exceptionally well!Understanding/application of the material.
Last but not least - it's crucial that you not only understand the skills and concepts learned in class, but you know how to apply them appropriately. It is very important that you know the foundational skills and concepts of the inpatient physical therapy exam in order to be successful with your practical. For example, patients who have experienced a stroke will show different levels of debilitation. If a patient has a 4/5 strength on the involved side, it would most likely be inappropriate to perform dependent transfers or have them use an assistive device when they have shown that they are strong enough to do most of the work on their own. In the next section, I’ve included some of the important information that you should know/study.

What You Should Know/Study
Injuries/disabilities.
Be familiar with the common cases you will encounter at an inpatient setting, such as traumatic brain injuries, spinal cord injuries, strokes, hip replacements, knee replacements, above and below the knee amputations, and extremity fractures.Assessing vitals.
Accurately measuring and assessing a patient’s vital signs is crucial. You should know how to properly measure heart rate, respiratory rate, blood pressure, and oxygen saturation. Know the normal values for each and be specific with your findings. For heart rate, include the rhythm (regularly regular, regularly irregular, irregularly irregular) and the force (strong, weak, faint). For respiratory rate, include the rhythm (regular or irregular) and the depth (shallow, deep, labored). Typically, you should assess a patient’s vitals while they are supine and again after mobility when they are seated (especially if any alarming signs or symptoms are present).Verbal systems review/red flags.
Red flags include fever, chills, vision changes, weight changes, bowel changes, blood in urine, difficulty swallowing, nausea, dizziness, vomiting, fatigue, syncope, dyspnea, chest pain, severe night pain, numbness, and weakness. Be sure that your patient is not currently experiencing any of these symptoms (or has not experienced them since they have been hospitalized). The presence of one or more red flags may pose immediate safety threats to the patient, so be sure to inform their nurse or doctor (in a real-life scenario) of your findings right away.Pressure ulcers and contractures.
Be sure to check the common bony prominences where a patient may develop a pressure ulcer, including the posterior calcaneus, lateral malleolus, ischial tuberosity, and greater trochanter. Also, determine if a muscle group contracture has developed due to their current immobility.Lines and tubes.
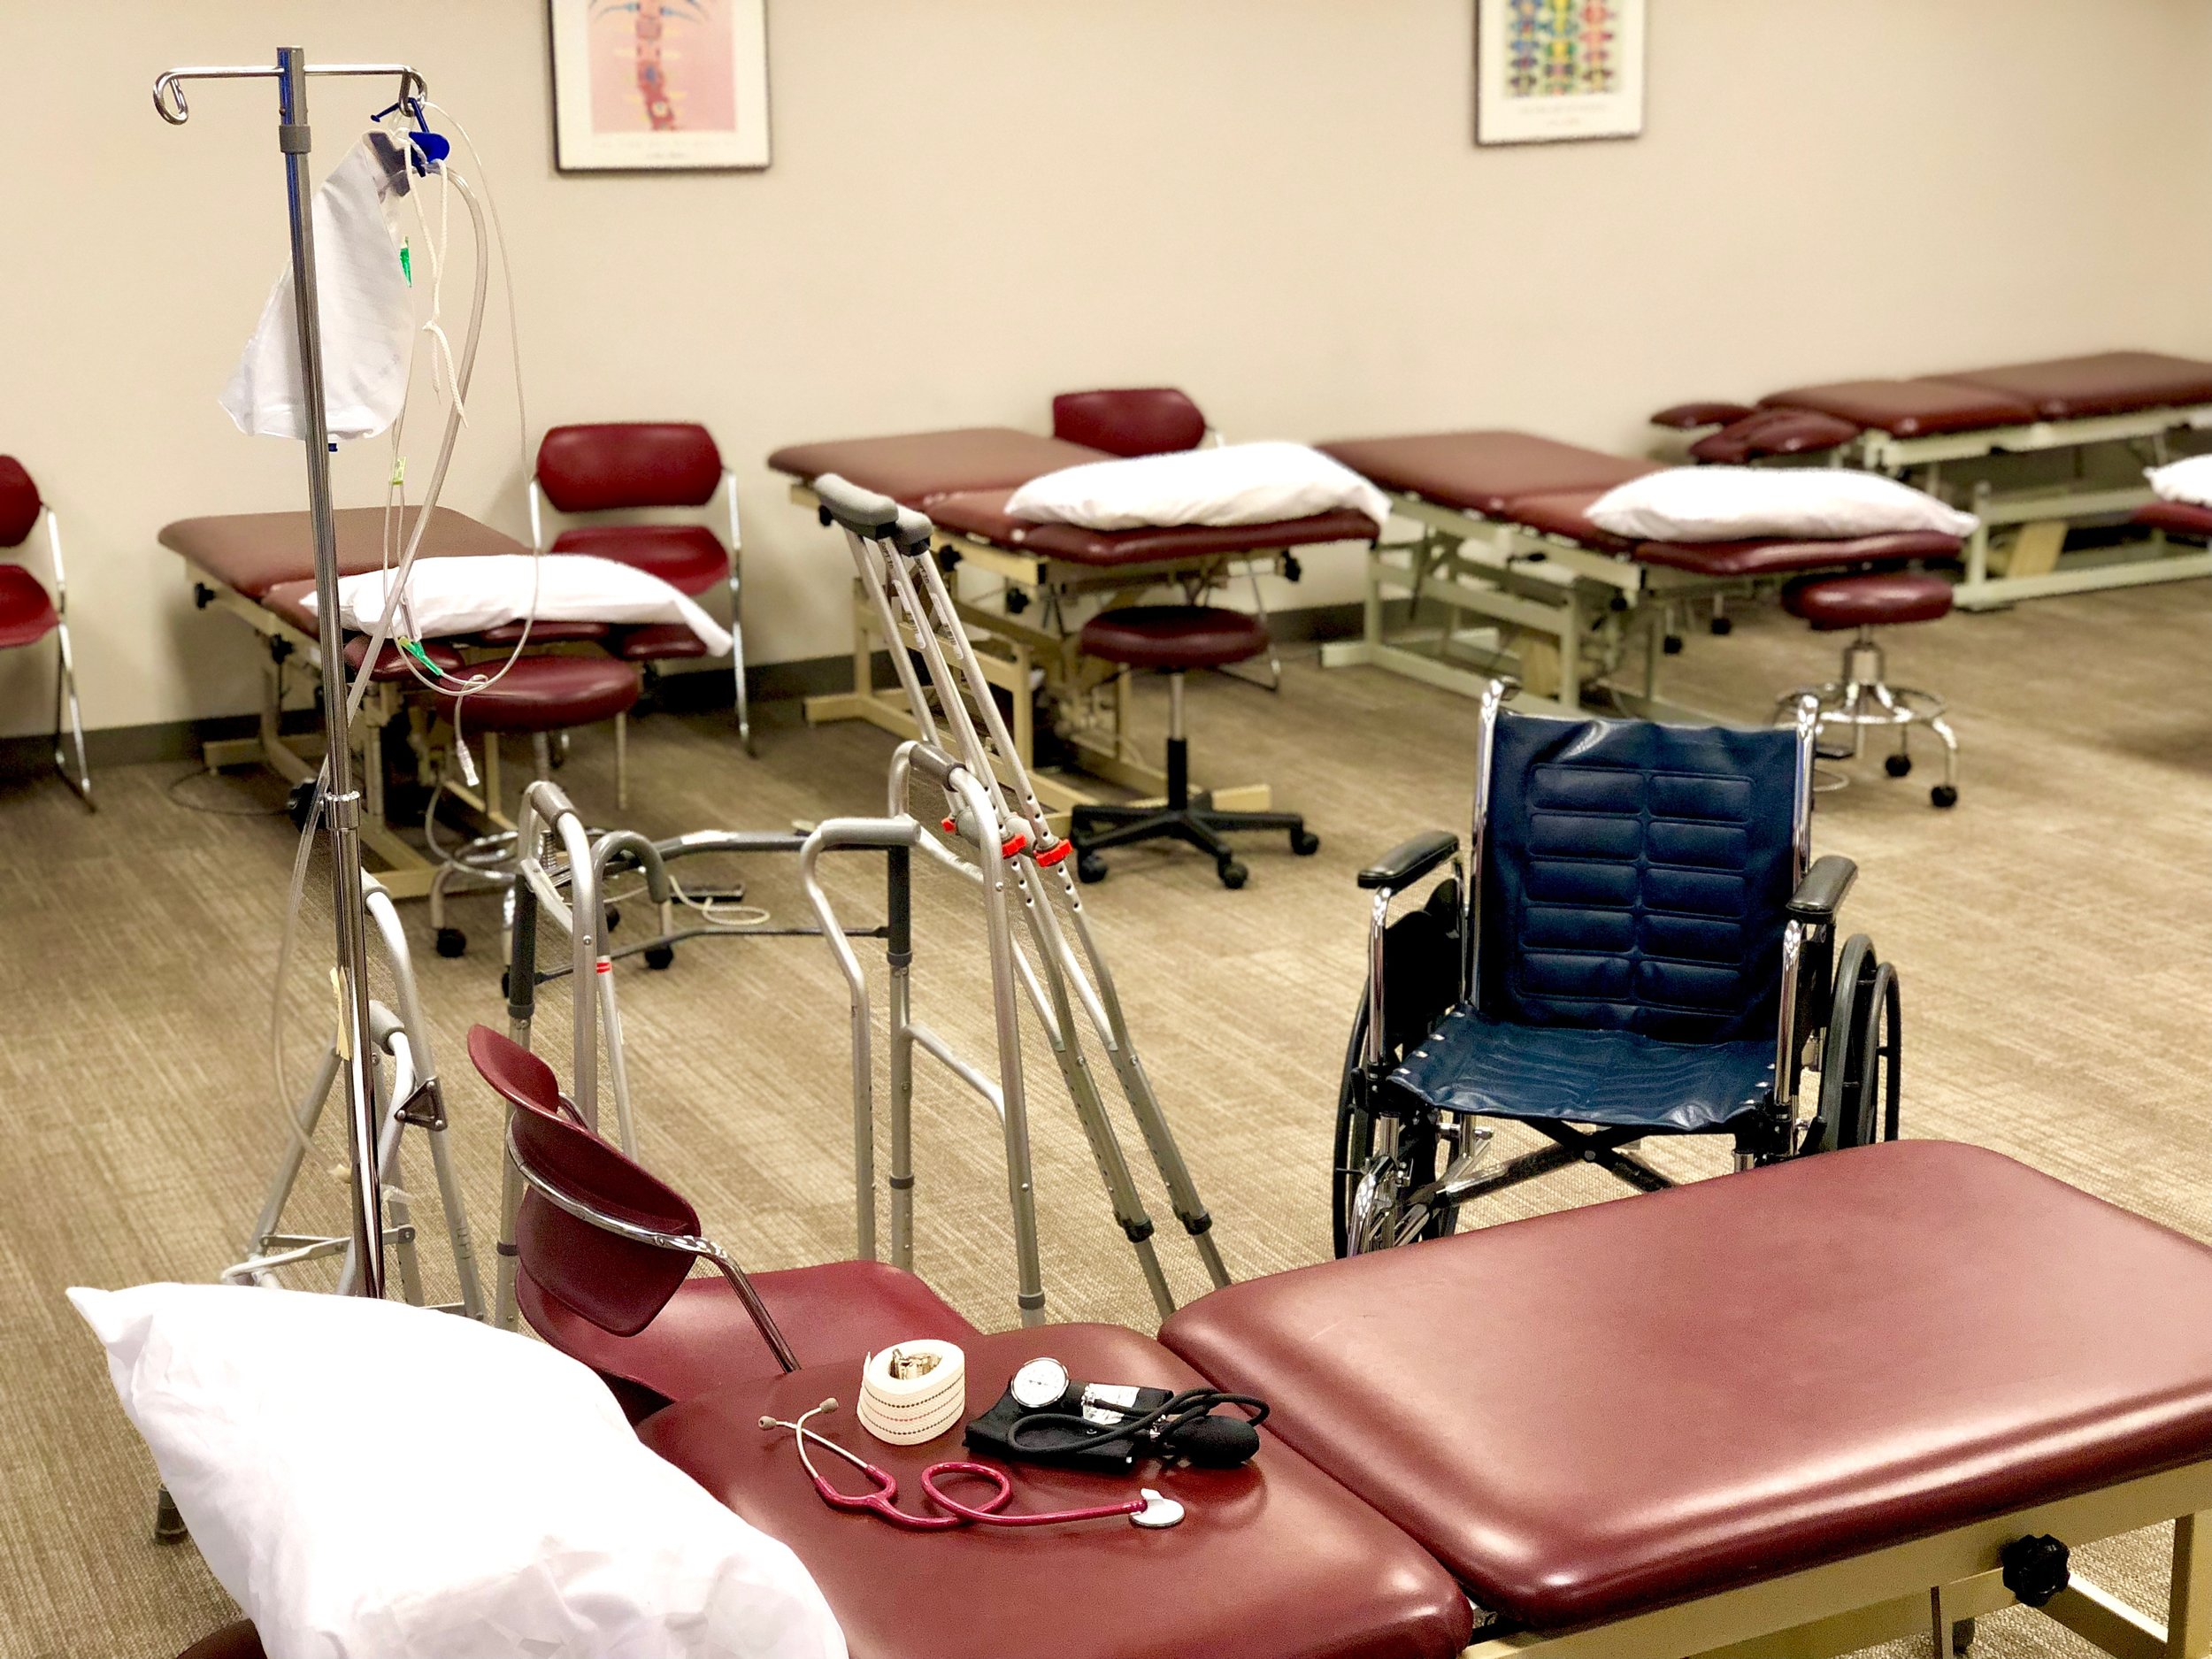
Be familiar with the different kinds of lines and tubes your patient may have, including a catheter, IV, epidural, nasal canula, nasogastric tube, chest tube, central line, PICC line, arterial line, dialysis, fistula, ventilator, pulse ox, and/or colostomy.Environmental safety and hazards.
SAFETY IS KEY! Be sure create a safe environment for the patient that is free of hazards, which includes optimally arranging their lines and tubes, assistive devices, following chair, etc.Levels of assistance.
Be familiar with the different levels of assistance, including dependent, maximal, moderate, minimal, contact guard, supervision, modified independent, and independent. Your proctor will likely ask you what level of assistance you had to give the patient and why.Bed mobility.
For bed mobility, know how to move a patient that is laying supine - side-to-side, to the head of the bed, to the foot the bed, to a prone position, to a sidelying position, and to a seated position.ROM/strength scale and testing.
Know how to assess a patient’s range of motion and how to grade their strength (using the 0-5 scale).Transfers.
For transfers, know how to perform a long sit, sit-to-stand, stand pivot, modified stand pivot, seated scoot, sliding board, mechanical lift, and dependent lift. Be familiar with how to perform these transfers both with and without an assistive device, such as a walker.Assistive devices.
Practice using different assistive devices, such as standard walkers, rolling walkers, hemi-walkers, quad canes, straight canes, crutches, and wheelchairs. Know how to adjust/fit them properly and know what kind of device is appropriate for your patient, based on their diagnosis, your findings during your exam, their limitations, and their cognition.Gait training.
With gait training, it is important to know the different kind of gait patterns, quality of movement, quantity of movement, weight bearing restrictions, and which assistive device(s) to useICF model.
Constructing an ICF model will help you tie everything together and come up with an appropriate discharge plan. Be able to organize your findings under the correct classification, including their health condition, impairments, functional limitations, participation restrictions, environmental factors, and personal factors.Discharge planning.
Determining an appropriate discharge plan is very important for the future care of your patient. Know the differences between the different settings, including outpatient, skilled nursing, inpatient rehabilitation, home health, assisted living, and nursing homes. You should be able to determine which setting will be the most appropriate, beneficial, and safe place for your patient to receive continued care and why.

Additional Tips
Don't forget to introduce yourself.
Seems silly to mention - but I've seen people miss this important step so many times because of nerves or just trying to jump right into the evaluation! Introduce yourself to your patient and start building a meaningful relationship with them the moment you walk into the room. Be sure to explain your plan of action and obtain the patient’s consent to examine and/or treat them.Obtain all of the information you need to form a detailed patient profile.
Conduct a thorough history and make sure you gather all of the information you need to created an accurate, detailed profile of your patient. By the end of the evaluation, you should know their living environment, support system/assistance at home, occupation, hobbies, prior level of function, use of assistive device(s), ambulation status, driving status, hand dominance, past medical history (medical and surgical), family history, alcohol/drug/tobacco use, medications, allergies, chief complaint and its onset, current pain level, and their goals.Always put the patient's needs before yours and close with asking them if they have any questions or if there is anything else they would like to tell you.
This is so important! You have to remember that your patient's needs always come first and you should always wrap up your examination by asking them if they have any questions for you or if there is anything else they would like to tell you before you move on.Practice makes perfect.
Practice, practice, practice! The best way to feel comfortable in a practical setting and be prepared for anything that may be thrown at you is to get adequate practice! Practice as many different types of cases as possible, seeing as you never know what you may end up with. The more you practice, the more familiar you will be with all the different components of a practical. You definitely don't want to walk into your practical, see/hear something for the very first time, and have no idea how to respond/act appropriately.Have a logical flow, but don't be too structured and/or robotic.
Once you get enough practice, you will start developing a flow and will have a specific way you like to move from one thing to another. However, you must be able to expect the unexpected and be prepared to deviate from your typical routine, if needed. Any number of events could happen and you must be able to adjust your regimen accordingly. Also, one question that you may ask a patient may spark an answer to a question you planned on asking at a later time - which may throw you out of your groove. Don't have a "we'll get to that later" attitude and instead, be receptive to all of the information you receive from your patient, use it to your advantage, and keep moving forward.Always use a gait belt.
It's better to be safe than sorry. The last thing you want to do is drop your patient or cause them to go down because of inattentiveness. So, ALWAYS use a gait belt and be extra cautious of balance/coordination limitations your patient may have.

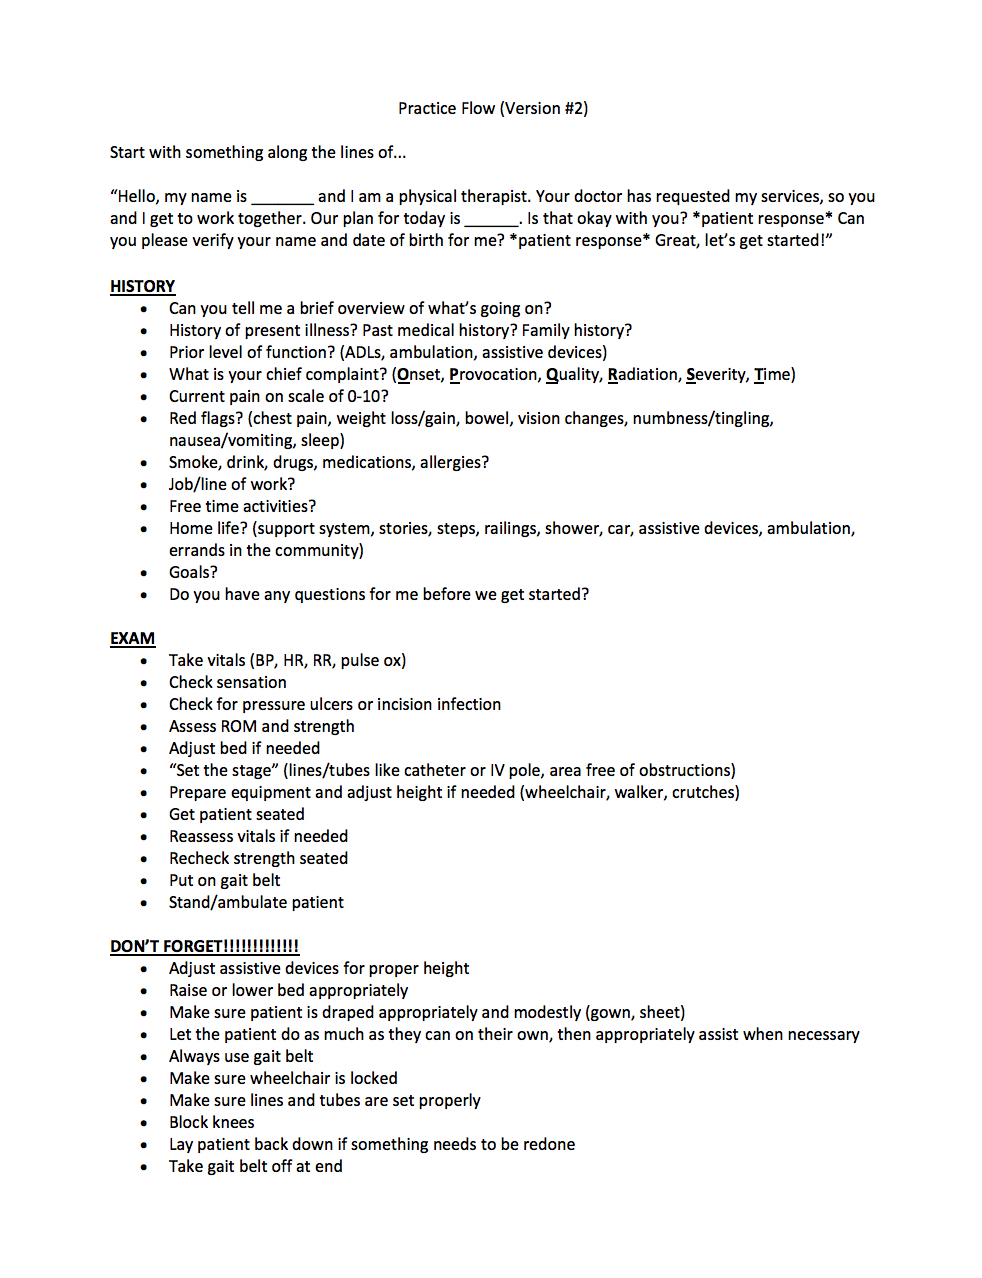
Resources I've Created
*Feel free to use these as study tools or foundations to create your own flow!!*

I hope you found this information helpful and can use it to your advantage to show your practical who’s the boss! The first one is always super scary, but the more you practice, the easier/more natural it will become!
Good luck! :)